Checking operation with your own Piece/iiidea
This chapter is organized as follows.

Create an iiidea using the Pieces you have uploaded
In the previous chapter, you have registered Pieces that you have created and that work only on your application in Riiiver. Since they have only been registered, the Pieces you have created are not visible to others, but you can use to test them since you have registered them yourself.
Note: To use Pieces during testing, you must log in to Riiiver with the same email account you used to register as a developer. Registering as a developer is separate from registering as a Riiiver user. If you get an error message that your account is not registered when you try to enter the Riiiver environment using the same email address you used to register as a developer, please use the same email address to register in the Riiiver environment. Only when the email address registered as a developer is the same as the email address registered as a Riiiver user, the user will be able to see the Pieces in test use.
Now proceed and use RiiiverApp to create an iiidea. Please refer to this quick manual for instructions on how to use RiiiverApp. The purpose of creating an iiidea at this time is to create an iiidea that includes all of T/S/A Pieces that you have created. Use the following steps to create an iiidea.
- For the brand, select the information you have registered in your "Company Information" section. (Swipe across the area where CITIZEN is first displayed, and you should see the names and icons of the various brands one after another.)
- After selecting the brand, select the device. You should see the name and icon of the devices you have registered.
(You should see the company icon that you have registered in the light blue area of the screen below, and pictures of the devices that you have registered in the device area. If no picture is registered, only the device name will be displayed.)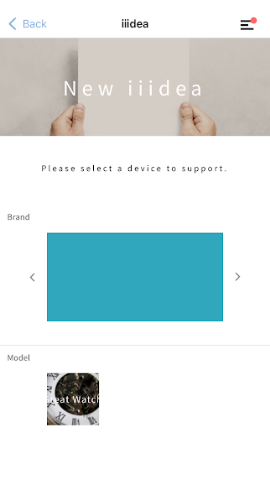
Select the Pieces you have created in the T, S, and A selection screen.
If you have not changed PieceJSON of the sample app, the S Piece category is displayed as the “Communication” category for S Piece.Is it created? If the following screen appears, it is successfully created.
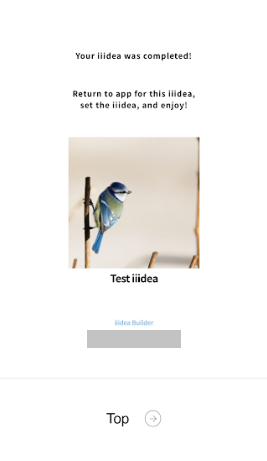
Download the iiidea you created
At the end of the previous section, the iiidea you created should have been downloaded into your user account.
What is downloading an iiidea?
When an iiidea was downloaded from the Riiiver Store earlier, where was it downloaded to?
By accessing the Riiiver Store site via RiiiverApp, the iiidea “Sa” was downloaded in this example above. As shown in the diagram above, rather than actually downloading the data to RiiiverApp, the data that this user downloaded the iiidea "Sa" is simply stored in the server-side database in the user information managed on the Riiiver cloud. What kind of iiidea is downloaded by the users is managed on the cloud side. When the same user uses other applications to use the iiidea, the user receives a list of downloaded iiideas from the cloud side before using the iiidea. It is the same with the sample app you are using now. See the diagram below.
The sample app can retrieve a list of iiideas downloaded by the logged-in user after logging into Riiiver. (Specifically, the getMyApplet() method of the RiiiverSDK is used to obtain the iiidea list.) By specifying DeviceID and/or VendorID, the application requesting a list of downloaded iiideas will only display those iiideas that can work with the specified Device or Vendor application among the iiideas that the user has downloaded.
Now, you can actually use the sample app to acquire and display the iiidea that you have created.
Make sure you are logged in to the sample app with the same email account as your developer account. If you are logged in with a different email account than the one you registered as a developer, please log in to your Riiiver account again with the same email address you registered as a developer.
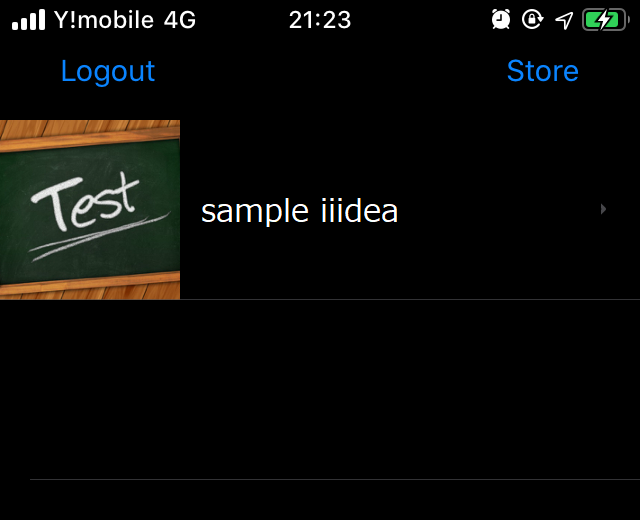
Once you are logged in, you should see the previously black screen has changed to the My iiidea list screen like the picture below, where you can see the iiidea that you have created.
From the user’s viewpoint, the Riiiver user experience (UX) is as follows:
- Download a new iiidea from the Store.
The downloaded iiidea is displayed and set up by the supported device.
After that, the next UX is as follows:
Activate the iiidea via the supported application.
- The corresponding Trigger Piece executes the iiidea,
At this time, you are trying to execute the iiidea you have created using the sample app. Now, proceed to debug and check the actual execution of the downloaded iiidea.
Activate an iiidea
In order to use the iiidea that appears on the My iiidea list screen, you need to enable the iiidea before use. It is called activating an iiidea.
In the sample app, it is implemented to enable/disable each iiidea using the OS standard UI switch.
For more details, please check the contents of func activateChanged in IiideaInfoViewController.swift for iOS, or activate.setOnCheckedChangeListener in IiideaInfoFragment.kt for Android, while debugging.
The sample app is designed to display the iiidea details screen upon tapping the iiidea list in the My iiidea list, and to activate the iiidea on this details screen.
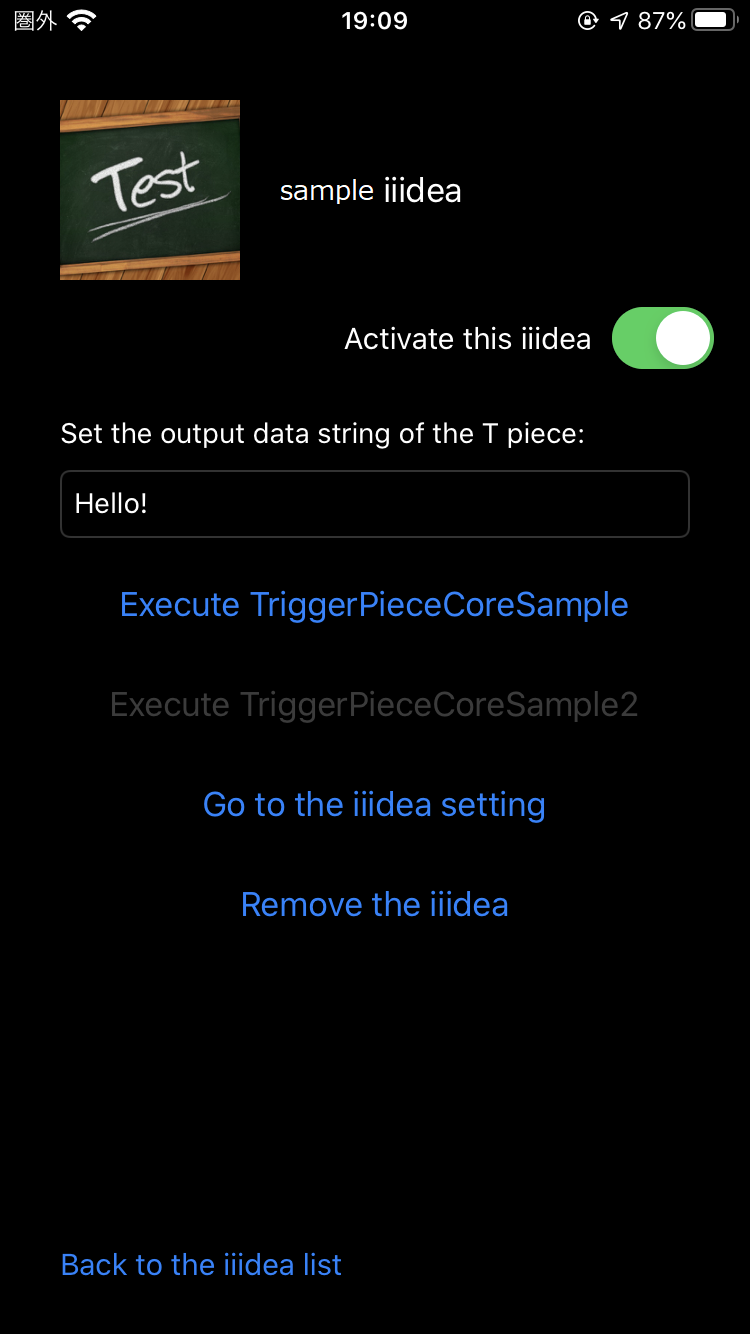
You can use “Activate this iiidea” switch to switch between enable and disable. Try switching it while debugging. As you switch, you should be able to see the switch in the Debug Log as follows:
...
activate succeeded.
...
deactivate succeeded.
(This log is output by RiiiverSDKManager.swift for iOS, or RiiiverSDKManager.kt for Android.)
What is important in this debug check process is that the iiidea must be activated before use, in other words, before it is triggered.
Debug the sample app operation
Once the iiidea is activated, you can now execute the iiidea.
In the sample app, a button named Execute TriggerPieceCoreSample is placed in the activated iiidea details screen, and it is implemented to execute the iiidea by tapping this button. In other words, the trigger for the iiidea you have created is a tap on the “Execute TriggerPieceCoreSample” button. When this button is tapped, the PieceCore of T Piece is executed.
When “Execute TriggerPieceCoreSample” is tapped, the
“triggerPieceCoreSample” function in “IiideaInfoViewController.swift” for iOS, or the “pieceCore1.setOnClickListener” function in “IiideaInfoFragment.kt” for Android, is called.
...
@IBAction func triggerPieceCoreSample(_ sender: Any) {
  guard let iiidea = iiidea else {
    print("trigger failed. reason: No iiidea")
    return
  }

  print("preference:\(iiidea.triggerBlockUserPref ?? [:])")

  var userInfo: [String:Any] = [:]
  userInfo[TriggerNotification.Key.Identifier] = iiidea.getId()
  userInfo[TriggerNotification.Key.Output] = triggerInput.text

  // iiidea実行の通知
  NotificationCenter.default.post(name: TriggerNotification.Name.sampleTrigger, object: nil, userInfo: userInfo)
}
...
...
pieceCore1.setOnClickListener {
Timber.d("pieceCore1")
val text = output_edit!!.text.toString()
val intent = Intent(TriggerPieceCoreSample.ACTION)
intent.putExtra("identifier", iiidea!!.id)
intent.putExtra("output", text)
activity!!.sendBroadcast(intent)
}
...
In this sample app, when the button is tapped, it uses the notification center or broadcast function to communicate within the app that the iiidea has been executed. It is implemented this way to account for the case in which a single T Piece is used by multiple iiideas.
As this part is deeply related to activation, Trigger Piece delegation, and set up by PieceJSON, it will be explained in detail.
It is important to understand the relationship between PieceJSON and PieceCore. If you have any questions, please review the specifications again, and come back here once you have finished reviewing it completely.
Check the operation when iiidea is running
You can see what the SDK actually does as you check the operation and debug the sample app. Build the sample app and put it in a debug mode. Then apply the following operation to the app.
- Start the sample app.
- Activate the sample iiidea.
- Enter “Hello!” in the text field above the “Execute iiidea” button.
- Tap the “Execute iiidea” button.
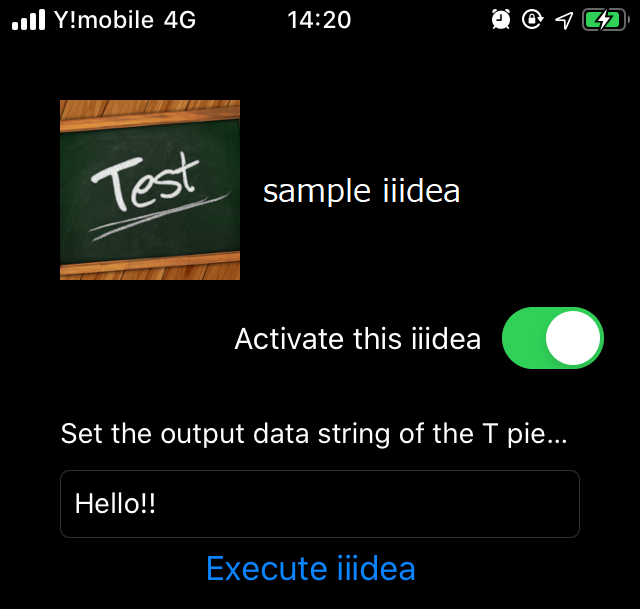
You should then see the debug log as follows:
Trigger is fired! output:["triggerSampleInfo": "Hello!!"], preference:[:]
ServicePieceCoreSample input:["sampleInfo": "Hello!!"], preference:[:]
ActionPieceCoreSample input:["sampleInfo": "Hello!!"], preference:[:]
TriggerPieceCoreSample Trigger is fired! output:{triggerSampleInfo=Hello!!}
ServicePieceCoreSample inputJson: {"sampleInfo":"Hello!!"}, preferenceJson: {}
ActionPieceCoreSample inputJson: {"sampleInfo":"Hello!!"}, preferenceJson: {}
You can now look at the process by which each Piece is called. This sample app does something very simple.
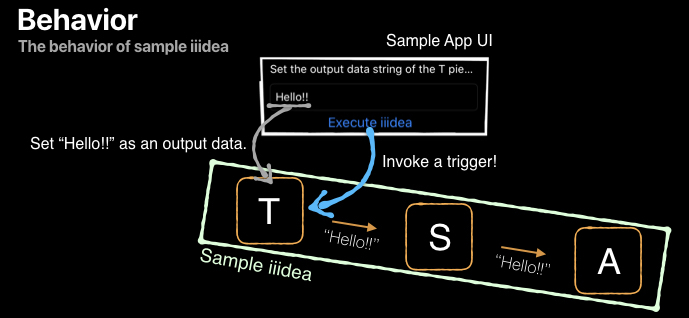
The string "Hello!!" entered in the text field is output by Trigger Piece, and "Hello!!" is passed on to Service Piece and to Action Piece in that order. As the mechanism of running an iiidea is a bit complicated, it is explained step by step.
Activation
From the end-user's perspective, you can activate the iiidea by simply swiping a switch,
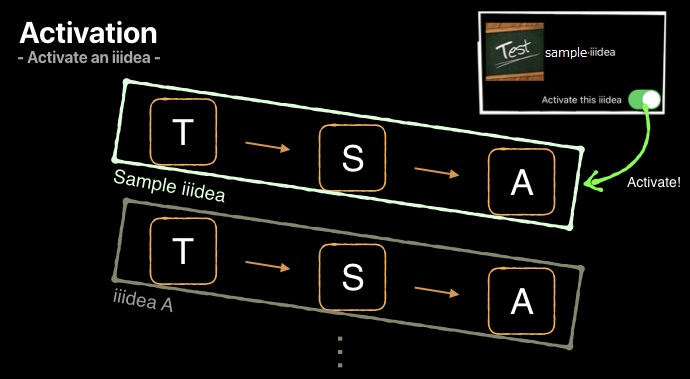
but, in fact, the following process is being executed in the sample app.
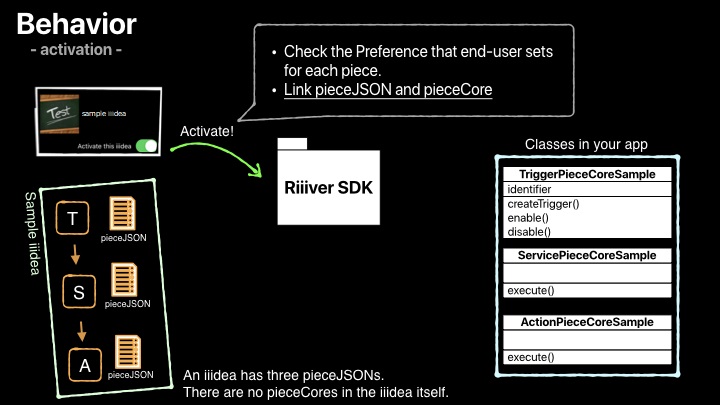
- Check the Preference set by the user for each Piece (See this document for preference settings.)
- Link PieceJSON to PieceCore
This process is described in func activateChanged() in IiideaInfoViewController.swift for iOS, or in activate.setOnCheckedChangeListener in IiideaInfoFragment.kt for Android. The Preference part will not be discussed here since it is not intrinsically related to iiidea activation. (For more details about this part, please see here.)
The important part is the implementation of the part that requests RiiiverSDK to activate the target iiidea.
Take a look at RiiiverSDKManager code.
func activate(iiidea: ERApplet, completion: @escaping ((_ isSuccess: Bool, _ error: Error?) -> Void)) {
    // Update the token to keep the auth session.
    self.getAWSToken { (isSuccess, error) in
        if (isSuccess == false) {
            print("activate failed. reason: No token")
            completion(false, error)
            return
        }
        // Activate the iiidea via Riiiver SDK.
        iiidea.activate() { unauthPermissions, serviceProxyData, error in
            guard unauthPermissions == nil || unauthPermissions == [] else {
                print("activate failed. reason:No permission")
                completion(false, error)
                return
            }
            guard error == nil else {
                let riiiverError:ERSDKError = error as! ERSDKError
                print("activate failed. reason: \(riiiverError.rawValue)")
                completion(false, error)
                return
            }
            print("activate succeeded.")
            completion(true, error)
        }
    }
}
fun activate(iiidea: ERApplet, completion: (isSuccess: Boolean, error: ERError?) -> Uni) {
val erSdk = erSdk
if (erSdk == null) {
// initialize uncompleted
Timber.e("not initialized")
completion(false, null)
return
}
// Update the token to keep the auth sesion.
getAWSToken { isSuccess: Boolean, error: Exception? ->
if (!isSuccess) {
Timber.e(
"updateAWSToken failed. reason: %s",
if (error != null) error.message else ""
)
completion(false, null)
return@getAWSToken
}
iiidea.activate(context) { _: Array<String>?, _: Array<ERServiceProxyData>?, eError: ERError? ->
if (erError == null) {
Timber.d("activate succeeded.")
completion(true, null)
} else {
completion(false, erError)
}
}
}
}
When activating an iiidea, RiiiverSDK executes the following tasks:
- Check iiidea and Pieces that the iiidea is comprised of
- Load the content of PieceJSON of each Piece and check the "executor" key
- Find PieceCore based on the value of the checked "executor" and load the name class
Here is the operation in more detail.
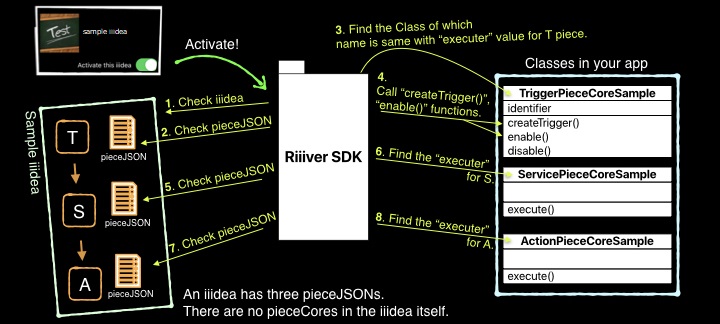
The diagram above shows the link process between PieceJSON and PieceCore. If the class specified by PieceJSON is not found, then the SDK returns an error. As shown in step 4 in the diagram, upon successful activation, the functions createTrigger() and enable() in the Trigger PieceCore class are automatically called.
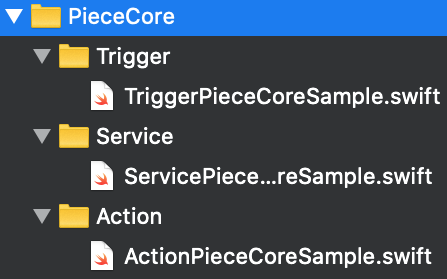
In the iOS version of the sample app, each PieceCore is stored in the PieceCore folder.
When you actually develop an application, this is where you will place the files you create.
In the Android version of the SDK, it is necessary to set the path that contains each PieceCore in the SDK beforehand.
It is not necessary in the iOS version.
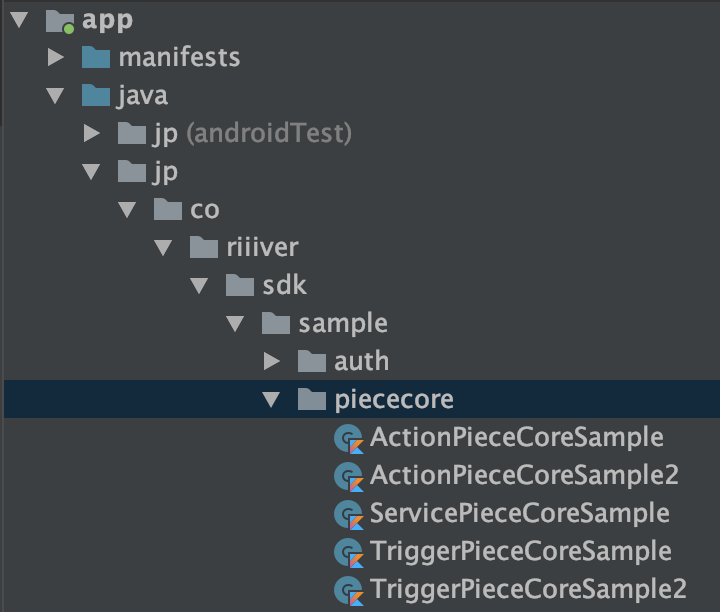
In the Android version of the sample app, since PieceCore is stored in jp.co.riiiver.sdk.sample.piececore, set the path in the SDK as follows:
object RiiiverSDKConfig {
    var pieceCorePackageName = "jp.co.riiiver.sdk.sample.piececore"
...
object RiiiverSDKManager {

    private var erSdk: ERSDK? = null

    var accessToken: String? = null
    var idToken: String? = null
    private var context: Context? = null

    /**
     *  Initialize RiiiverSDK
     */    fun initialize(activity: Activity, complete: (isLoggedIn: Boolean) -> Unit) {
        context = activity
        ERAuth.initialize(activity, ERAuthDelegateImpl(activity)) {
            Timber.i("initialized")

            erSdk = ERSDK.Builder.with(activity)
                .includeBlockExecutorPackageName(pieceCorePackageName).build()

            complete(ERAuth.getInstance().isLoggedIn)
        }
        // Initialize Preference
        IiideaSettingFragment.initialize(activity)
    }
...
Before explaining the operation of each PieceCore for T, S, and A, take a look at the diagram below showing the linkage between the sample app, RiiiverSDK, and PieceCore implemented as a class within the app.
Please read the following descriptions of each PieceCore operation referring to the above diagram.
Fire Trigger Piece
Trigger PieceCore can be created by inheriting from the ERTriggerBlockExecutorclass.
The ERTriggerBlockExecutor class has the createTrigger(), enable() and disable() functions, which do not exist in the PieceCore for S Piece or A Piece.
As the purpose of T Piece is to initiate an iiidea, it has a different interface than the other PieceCore class.
Here is a brief description of each function of Trigger PieceCore.
createTrigger()
When iiidea is activated, an instance of the ERTriggerBlockExecutor class inherited by PieceCore is created inside RiiiverSDK. At this time, createTrigger is called. Since the argument contains the iiidea ID, T PieceCore can also determine what the activated iiidea is.
If the T Piece has any items that can be set by the user, the values entered by the user in the Preference settings screen are also passed as the argument preferenceJson when this function is called. User settings are read out and can be used for process information.
enable()
It is called upon activation. It is called immediately after createTrigger() above.
At this time, an instance of ERTriggerBlockDelegate is passed.
To execute iiidea, this instance is used to pull the trigger.
disable()
It is called upon deactivation (when iiidea is disabled).
The instance of ERTriggerBlockDelegate passed in enable() cannot be used.
Once disable() is called, the target iiidea cannot be executed.
Take a look at TriggerPieceCoreSample that actually fires the Trigger in the sample app.
@objc(TriggerPieceCoreSample)
class TriggerPieceCoreSample: NSObject, ERTriggerBlockExecutor {
    weak var delegate: ERTriggerBlockDelegate?
    var identifier: String?

    // called when the notification of the TriggerPieceCoreSample execution comes.
    @objc private func didReceiveTriggerPieceCoreSampleTrigger(_ notification: Notification) {
        guard let userInfo = notification.userInfo else { return }

        // Check the ID
        guard let identifier = userInfo[TriggerNotification.Key.Identifier] as? String else {
            print("TriggerPieceCoreSample error in execution. reason:no ID")
            return
        }
        if identifier != self.identifier {
            // does not fire because the ID is wrong. - IDが異なるため発火しない
            return
        }

        // Get the text field's string and set it as a output of the T piece.
        var output = [ "triggerSampleInfo" : "" ]
        output["triggerSampleInfo"] = userInfo[TriggerNotification.Key.Output] as? String
        print("TriggerPieceCoreSample Trigger fire! output:\(String(describing: output))")

        // Trigger with outpur information
        delegate!.didTrigger(outputJson: output)
    }

    func createTrigger(blockJsonString: String, preferenceJson: Dictionary<String, Any>, applet: ERApplet) -> Bool {
        print("TriggerPieceCoreSample:\(self.identifier ?? "")]")
        identifier = applet.getId()
        return true
    }

    func enable(delegate: ERTriggerBlockDelegate) -> Bool {
        print("TriggerPieceCoreSample enable")
        self.delegate = delegate

        // Starts ovserving the notification for the "sampleTrigger" execution.  When received the notification, executes didReceiveTriggerPieceCoreSampleTrigger().
        NotificationCenter.default.addObserver(self, selector: #selector(didReceiveTriggerPieceCoreSampleTrigger(_:)), name: TriggerNotification.Name.sampleTrigger, object: nil)
        return true
    }

    func disable() {
        print("TriggerPieceCoreSample disable")
        delegate = nil

        // Stop observing the notification for the sampleTrigger execution.
        NotificationCenter.default.removeObserver(self, name: TriggerNotification.Name.sampleTrigger, object: nil)
    }
}
class TriggerPieceCoreSample(val context: Context) : ERTriggerBlockExecutor, BroadcastReceiver() {
var mDelegate: ERTriggerBlockDelegate? = null
var mIdentifier: String? = null
companion object {
const val ACTION = "jp.co.riiiver.sdk.sample.piececore.intent.action.TriggerPieceCoreSample"
}
override fun onReceive(context: Context?, intent: Intent?) {
intent?.also {
val identifier = intent.getStringExtra("identifier")
if (!mIdentifier.equals(identifier)) {
// does not fire because the ID is wrong.
return
}
val output = java.util.HashMap<String, Any>()
output["triggerSampleInfo"] = intent.getStringExtra("output")
mDelegate?.also { delegate ->
Timber.d("TriggerPieceCoreSample Trigger fire! output:%s", output)
delegate.didTrigger(context, output)
} ?: run {
Timber.e("TriggerPieceCoreSample createTrigger:delegate is null")
}
}
}
override fun createTrigger(
blockJsonString: String?,
preferenceJson: JSONObject?,
applet: ERApplet?
) {
Timber.d("TriggerPieceCoreSample createTrigger:%s", "")
applet?.also {
this.mIdentifier = applet.id
} ?: run {
Timber.e("TriggerPieceCoreSample createTrigger:applet is null")
}
}
override fun enable(delegate: ERTriggerBlockDelegate?): Boolean {
Timber.d("TriggerPieceCoreSample enable:%s", "")
delegate?.also {
this.mDelegate = delegate
} ?: run {
Timber.e("TriggerPieceCoreSample createTrigger:delegate is null")
}
context.applicationContext.registerReceiver(this, IntentFilter(ACTION))
return true
}
override fun disable() {
Timber.d("TriggerPieceCoreSample disable:%s", "")
if (mDelegate != null) {
mDelegate = null
context.applicationContext.unregisterReceiver(this)
}
}
}
The iiidea ID information is retained in createTrigger() that is called when an instance of TriggerPieceCoreSample is created.
The reason for this is related to what was mentioned earlier as " to account for the case in which a single T Piece is used by multiple iiideas." It will be explained later.
The instance of ERTriggerBlockDelegate is retained in enable() that is called when activated.
The sample app is designed to send a notification (NotificationCenter for iOS, Intent for Android) indicating that iiidea has been executed when the button to execute iiidea (Execute TriggerPieceCoreSample) is tapped, and it will start monitoring the notification when enable() is called.
The disable(), which is called when deactivating, discards the retained instance of ERTriggerBlockDelegate and terminates monitoring the iiidea execution notification.
This concludes the description of the implementation for the ERTriggerBlockExecutor function.
Next, you can look at the process called when the iiidea execution button is tapped.
@objc private func didReceiveTriggerPieceCoreSampleTrigger(_ notification: Notfication) {
    guard let userInfo = notification.userInfo else { return }

    // Check the ID
    guard let identifier = userInfo[TriggerNotification.Key.Identifier] as? Strng else {
        print("TriggerPieceCoreSample error in execution. reason:no ID")
        return
    }
    if identifier != self.identifier {
        // does not fire because the ID is wrong.
        return
    }

    // Get the text field's string and setit as a output of the T piece.
    var output = [ "triggerSampleInfo" : "" ]
    output["triggerSampleInfo"] = userInfo[TriggerNotification.Key.Output] as?String
    print("TriggerPieceCoreSample Trigger fire! output:\(String(describing: outut))")

    // Trigger with outpur information
    delegate!.didTrigger(outputJson: output)
}
override fun onReceive(context: Context?, intent: Intent?) {
intent?.also {
val identifier = intent.getStringExtra("identifier")
if (!mIdentifier.equals(identifier)) {
// does not fire because the ID is wrong.
return
}
val output = java.util.HashMap<String, Any>()
output["triggerSampleInfo"] = intent.getStringExtra("output")
mDelegate?.also { delegate ->
Timber.d("TriggerPieceCoreSample Trigger fire! output:%s", output)
delegate.didTrigger(context, output)
} ?: run {
Timber.e("TriggerPieceCoreSample createTrigger:delegate is null")
}
}
}
This function handles the process from receiving a tap on the iiidea execution button to executing iiidea. In other words, this is where the processing of T Piece PieceCore begins.
The notification received contains the ID of the iiidea to be executed and the output information to be passed to Service Piece.
First, the iiidea ID retained when createTrigger() is called is checked against the ID of the iiidea to be executed. This is the part to account for the case in which a single T Piece is used by multiple iiideas. As shown in the diagram earlier, a T Piece can also be a trigger for various iiideas. For example, if you create a T Piece that means "trigger when a button is tapped," it is possible to execute multiple iiideas with the same T Piece when the button is tapped, such as getting a weather forecast, or sending an email to your associate. If more than one of these iiideas are activated at the same time, there will be multiple instances of the same T Piece. (Instance of the class that inherited ERTriggerBlockExecutor)
This sample app uses the broadcast and notification center of the OS to issue events for all instances of the button-tap T Piece in the example. Each instance is implemented in such a way that it receives the iiidea ID and determines if it is the correct instance.
Next, the output information to be passed to ServicePiece from the notification information is obtained and formatted according to the format to be passed.
This piece of information will be passed as input information for ServicePiece.
If necessary, a process to read the information from the Preference settings should be inserted here. However, since the sample T Piece of this sample app is not designed to be a Piece that can set Preference, no such process is included.
Once the processing of T Piece PieceCore is finished, set output to didTrigger, and call it at the end. By calling didTrigger, a trigger is fired, and RiiiverSDK determines that all the processing of T PieceCore is complete and moves on to execute S Piece.
Execute Service Piece
Service PieceCore is created by inheriting the ERServiceBlockExecutor class.
The ERServiceBlockExecutor class has the execute() function.
Here is a brief description of the Service PieceCore functions.
execute()
It is called triggered by didTrigger of Trigger Piece.
The output information of Trigger Piece is contained in a parameter called inputJson.
Additionally, the information set by the user for the Piece in the Preference setting screen is contained in a parameter called preferenceJson.
Take a look at ServicePieceCoreSample that actually processes the Service in the sample app.
@objc(ServicePieceCoreSample)
class ServicePieceCoreSample: NSObject, ERServiceBlockExecutor {
    func execute(appletId: String, blockJsonString: String, preferenceJson: Dictionary<String, Any>?, inputJson: Dictionary<String, Any>?, completionHandler: @escaping ((Dictionary<String, Any>?, ERSDKError?) -> Void)) {
        print("ServicePieceCoreSample input:\(inputJson ?? [:]), preference:\(preferenceJson ?? [:])")

        var outputJson: Dictionary<String, Any>  = [:]
        if let inputJson = inputJson {
            // Input value goes through to the next piece as an output as it is
            outputJson["serviceSampleInfo"] = inputJson["sampleInfo"]
        }

        completionHandler(outputJson, nil)
    }
}
class ServicePieceCoreSample(val context: Context) : ERServiceBlockExecutor {
override fun execute(
appletId: String?,
blockJsonString: String?,
preferenceJson: JSONObject?,
inputJson: JSONObject?,
completionHandler: Completion1<MutableMap<String, Any>>?
) {
Timber.d("ServicePieceCoreSample inputJson: $inputJson, preferenceJson: $preferenceJson")
inputJson?.also {
//Input value goes through to the next piece as an output as it is
val outputJson = mutableMapOf(Pair("serviceSampleInfo", inputJson.get("sampleInfo")))
completionHandler?.also {
completionHandler.accept(outputJson, null)
}
}
}
}
When incorporating Service Piece into an actual application, rewrite the content of execute() to suit the purpose.
As long as ERServiceBlockExecutor is inherited, you may of course change the class name and storage location.
Use the input information received from Trigger Piece and the preferences information set by the user to create your code.
Once the necessary processing is done, make sure to set the output information to be passed to Action Piece and call completionHandler.
completionHandler()
Calling completionHandler means reporting to Riiiver SDK that the processing of S Piece PieceCore is finished. Riiiver SDK follows up with the execution of Action Piece.
When S Piece PieceCore is contained inside Riiiver SDK
Service Piece used for the target iiidea may not exist on the application side. (For example, it is applicable to Piece that uses web service to obtain weather information. To make it easy to create Pieces by utilizing web services, Riiiver is also equipped with a mechanism to create S Piece and A Piece by utilizing AWS Lambda without using RiiiverSDK. If you are interested, please refer here.) When using this mechanism, since S Piece PieceCore is inside Riiiver SDK, you do not need to implement anything, nor do you need to worry about the operation. Once the processing of PieceCore inside RiiiverSDK is finished, if the next A Piece is yours, your A Piece will be called by RiiiverSDK after S Piece is finished.
Execute Action Piece
Action PieceCore is created by inheriting the ERActionBlockExecutor class.
The ERActionBlockExecutor class has the execute() function.
Here is a brief description of each function of Action PieceCore.
execute()
It is called triggered by completionHandler of Service Piece.
The output information of Service Piece is contained in a parameter called inputJson.
Additionally, the information set by the user for the Piece in the Preference setting screen is contained in a parameter called preferenceJson.
Take a look at ActionPieceCoreSample that actually processes the Service in the sample app.
Action PieceCore behaves exactly like Service PieceCore.
@objc(ActionPieceCoreSample)
class ActionPieceCoreSample: NSObject, ERActionBlockExecutor {
    func execute(appletId: String, blockJsonString: String, preferenceJson: Dictionary<String, Any>?, inputJson: Dictionary<String, Any>?, completionHandler: @escaping ((Dictionary<String, Any>?, ERSDKError?) -> Void)) {
        print("ActionPieceCoreSample input:\(inputJson ?? [:]), preference:\(preferenceJson ?? [:])")

        var outputJson: Dictionary<String, Any>  = [:]
        if let inputJson = inputJson {
            //Input value goes through to the next piece as an output as it is
            outputJson["actionSampleInfo"] = inputJson["sampleInfo"]
        }

        completionHandler(outputJson, nil)
    }
}
class ActionPieceCoreSample(val context: Context) : ERActionBlockExecutor {
override fun execute(
appletId: String?,
blockJsonString: String?,
preferenceJson: JSONObject?,
inputJson: JSONObject?,
completionHandler: Completion1<MutableMap<String, Any>>?
) {
Timber.d("ActionPieceCoreSample inputJson: $inputJson, preferenceJson: $preferenceJson")
inputJson?.also {
val outputJson = mutableMapOf(Pair("actionSampleInfo", inputJson.get("sampleInfo")))
completionHandler?.also {
completionHandler.accept(outputJson, null)
}
}
}
}
As with the Service Piece, when incorporating Action Piece into an actual application, rewrite the content of execute() to suit the purpose. As long as ERActionBlockExecutor is inherited, you may change the class name and storage location.
Use the input information received from Service Piece and the preferences information set by the user to create your code.
Once the necessary processing is done, make sure to set the output information to be passed to Action Piece and call completionHandler.
Calling completionHandler will make Riiiver SDK to terminate the execution of the iiidea.
completionHandler()
Same as completionHandler of S Piece. Once the processing of A Piece PieceCore is also finished, call this function to report to RiiiverSDK that the processing is finished.
As A Piece is the last Piece, calling this handler means the execution of the iiidea is terminated.
When A Piece PieceCore is contained inside Riiiver SDK
Exactly the same as the case [When S Piece PieceCore is contained inside Riiiver SDK](#S PieceのPieceCoreがRiiiverSDKに内蔵されている場合). Whether the execution of A PieceCore inside RiiiverSDK is finished or the execution of the PieceCore that you have created is finished, for RiiiverSDK, it means that the execution of the iiidea is finished.
RiiiverSDK allows only one iiidea to run at a time. Once A Piece is finished and the iiidea execution is finished, RiiiverSDK can accept the next Piece execution.
Activation can be done for multiple iiideas simultaneously.
Summary and the next step
This concludes the explanation of the T Piece, S Piece, and A Piece that you have created for the sample app, and the simple debugging using the iiidea with these Pieces. Thank you for your effort.
Having completed the explanation using the sample app, the next step is to use this document to explain how to incorporate RiiiverSDK into your application and what you need to be aware of.
In the sample app at this time, as it is distributed with some files not included in RiiiverSDK already prepared, there are some parts that are not explained. An example may be the ability to log in with your Facebook or Google account as you saw at the beginning.
Please read the document as things like additional UI to be considered when incorporating RiiiverSDK into your application are also included.
Terminology
New name and old name
| Old Name | New Name | Description |
|---|---|---|
| ER | Riiiver | The project name at the time of Riiiver development is -ER. The name remains in the code developed at that time. Please interpret it accordingly. |
| Applet | iiidea | Refers to a small application that users can create with No Code by using RiiiverApp. |
| Block | Piece | Elements that make up iiidea. There are Trigger Piece、Service Piece、and Action Piece. |