Using the PieceJSON Generator
What is the PieceJSON Generator?
The PieceJSON Generator is an online, in-browser assistance tool intended to help streamline Piece creation. Use it to help make a new PieceJSON, confirm and debug the formatting of your PieceJSON, and view how your Piece will appear in-app to the end user. You can also utilize this tool to download a ProxyCore file (.js format) when making a Piece using Lambda.
We recommend operating the PieceJSON Generator within the most recent version of the below browsers:
Microsoft Windows
- Google Chrome
Mac OS
- Google Chrome
- Safari
Read below for instructions on how to use this tool from conception to creation, and click the following link to head over to the PieceJSON Generator whenever you're ready.
https://piecejson-generator.riiiver.com/

Making a Piece
Consider the iiidea
First, think about what kind of iiidea you want to bring to life. What are some interesting or useful iiideas that you want to see, and how can your Piece fit into the T・S・A Piece scheme to make these iiideas?
Please refer to the public list of currently available Pieces when thinking about what Piece you want to make.
Want to make an iiidea but don't see the Piece you need? Make the Piece yourself!
In the example on this page, we're going to make an S Piece that will simulate a dice roll. We want an iiidea that is able to show us a dice roll on our watch hands after pressing a button.
- T : Button Press
- S : Dice Roll
- A : Watch Hand Point
Think about the Piece
After deciding on your iiidea, think about the details of the Piece you want to make. In this case, what is the exact function that you want your "dice roll" Piece to perform, and with what types of T or A Pieces do you want it to connect?
Please refer to our documentation on How Riiiver Works for an overview of Pieces in general.
Preferences
Let's also consider if there are any "Preferences" that we want to include in order for the user to personalize their experience with your Piece.
In this example, we're going to let our users choose how many sides they want their virtual die to have. They'll choose a 6-side, 8-sided, or 12-sided die, making their selection via a drumroll-style user interface.
Please refer to the Preferences usage documentation for more detail regarding preferences use and implementation.
Input / Output
Now think about the information going in and out of your Piece. The type of input/output programmed into your Piece also determines what other Pieces in the Riiiver system you will be able (or unable) to connect to your Piece.
In our current dice roll example, we don't need to set any input because really we will take any incoming data of any type as a signal to trigger our Piece, and for our output we'll be showing the numerical value of our dice roll result.
- Input: (none)
- Output: number (with a minimum of 1 and maximum of 12, for when our users play with the 12-sided die)
Refer to the input/output of other published Pieces on the public list of currently available Pieces. Please also refer to our documentation on Connecting Pieces for more information on the technical aspects of matching your Piece to others.
Making a PieceJSON
It's time to actually start making our PieceJSON! Please open the PieceJSON Generator to follow along.
Using the Template Piece
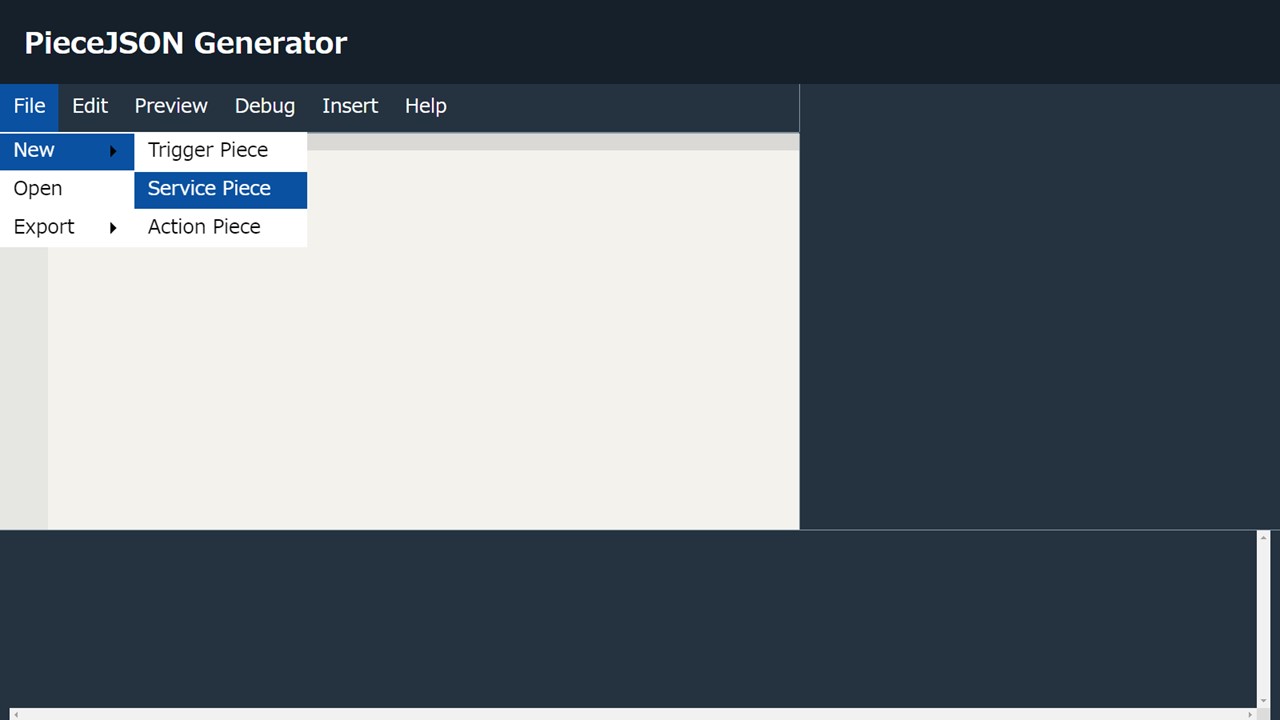
Generate the PieceJSON Service Piece template by navigating to File > New > Service Piece and clicking on "Service Piece" as seen in the image below.
The selected template will then appear in the Generator.
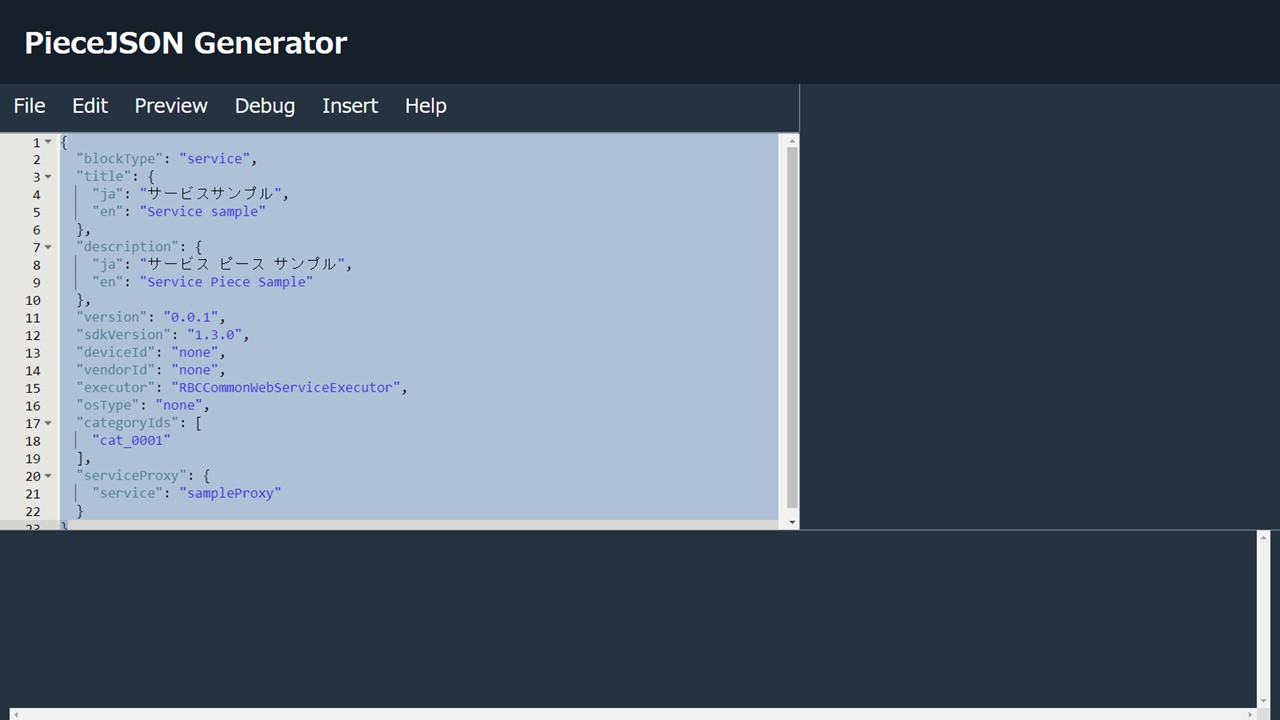
Let's look at this template content and consider what we need to edit.
For detailed descriptions and use conditions of the keys included in the PieceJSON, please refer to our documentation on Piece JSON keys.
blockType :We're making an S (service) Piece, so no change here. Leave as "service."
title, description, version : We're definitely going to change this. Let's give our Piece a title and description that makes it easy to understand to the user, and a version number that makes it easy for us to manage.
"title": {
  "ja": "サイコロ",
  "en": "Dice"
},
"description": {
  "ja": "【どんなPiece?】\nサイコロを振ります。出た目の数字を次のPieceに渡します。\n\n【どうやって使うの?】\nさいころの形状(面の数)を設定してください。",
  "en": "~~What is this Piece?~~\nRoll virtual dice and get the value of your roll.\n\n~~How do I use it?~~\nYou can select how many sides that dice have.\n\n"
},
"version": "1.0.0",
sdkVersion, deviceId, vendorId, executor, osType: Since we're making a Piece using the Lambda environment, we don't need to worry about changing any of these in this case.
categoryIds : You can choose to select your Piece's category by either selecting an ID via the menu (Insert > CategoryIds) or entering directly into the editor. To remove any unnecessary IDs that may have been added to the code in error, please erase directly within the editor.
For more information about Piece categories, please refer to the documentation on Category IDs.

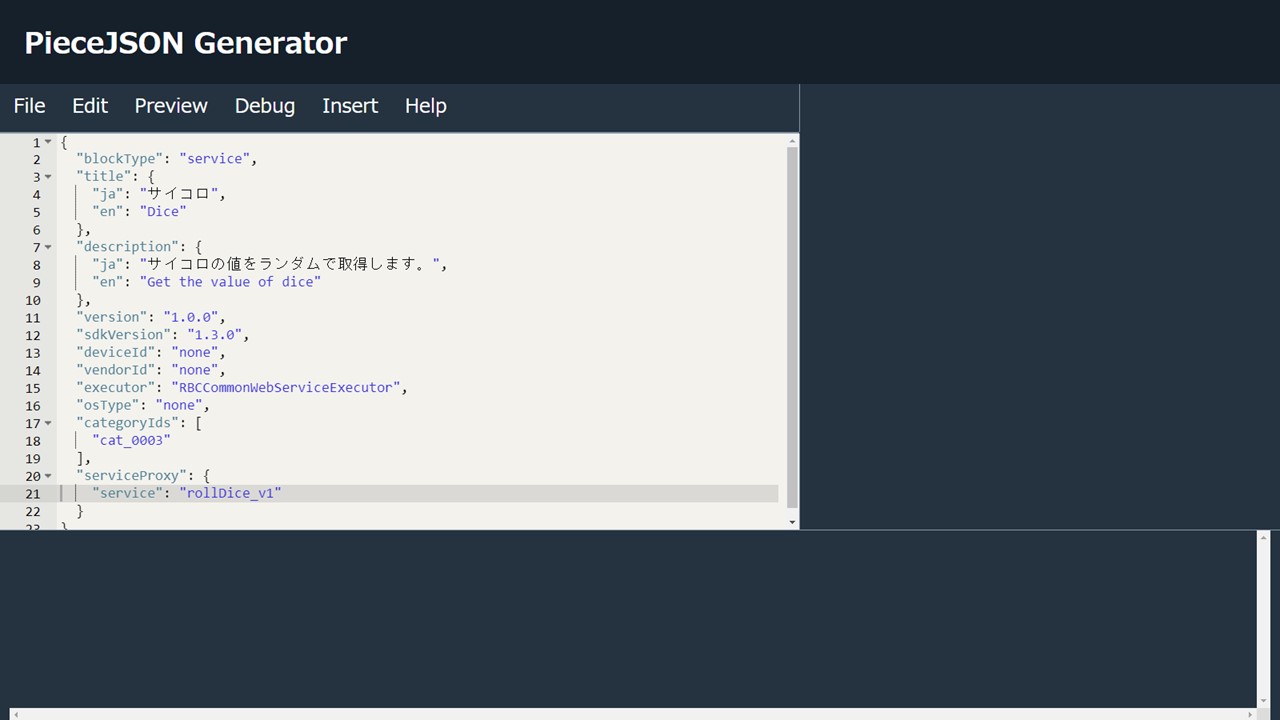
- serviceProxy:We definitely need to change this. The value here will become the name of our ProxyCore file. All published Pieces on Riiiver need to have a unique serviceProxy name, so be sure to choose a name that is distinct.
"serviceProxy": {
  "service": "rollDice_v1"
}
Adding Preferences
Explore and add user-editable preferences by navigating to Insert > Preferences.
In our example, we want our users to be able to select how many sides their die has (6, 8, or 12) via a drumroll menu, so we're going to select Insert > Preferences > Drumroll > Number(Enum).
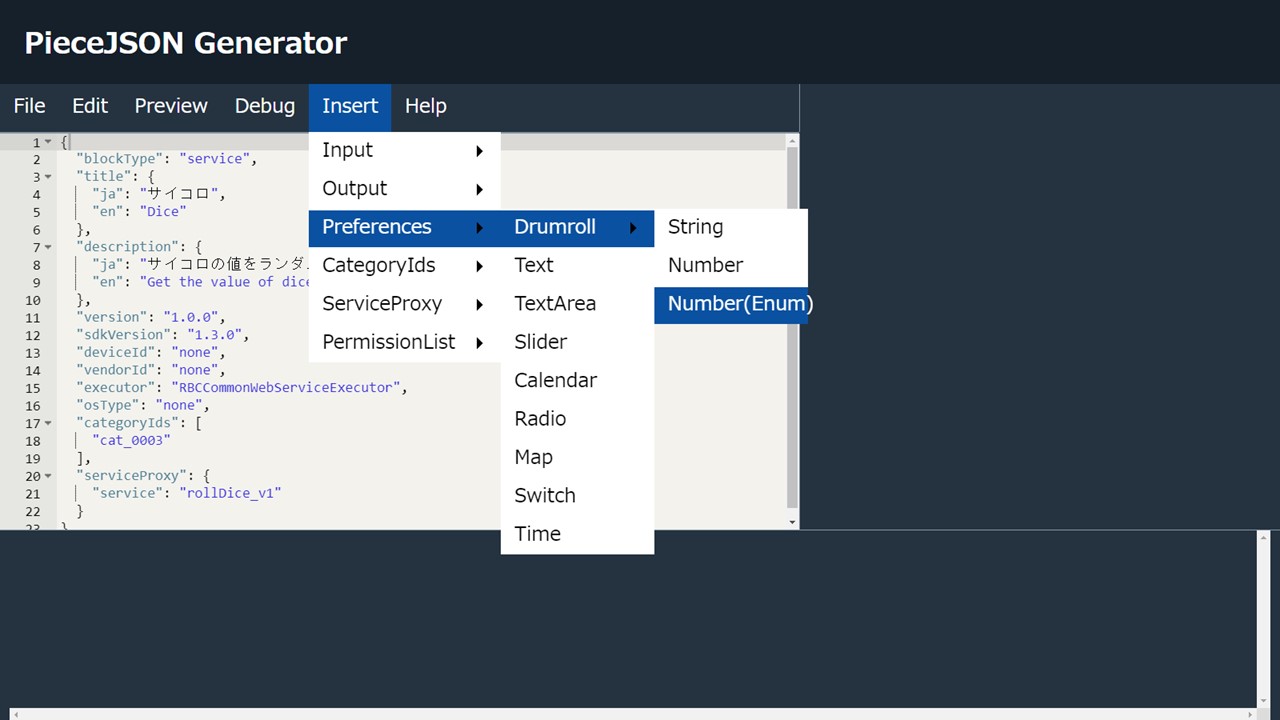
Once you've clicked on Number(Enum), the below text will be added into your PieceJSON.
"preferences": {
  "type": "object",
  "properties": {
    "sampleDrumroll": {
      "x-input-type": "drumroll",
      "type": "number",
      "x-title": {
        "ja": "タイトル",
        "en": "Title"
      },
      "x-description": {
        "ja": "説明",
        "en": "Description"
      },
      "enum": [
        0,
        1,
        2,
        3,
        5,
        7,
        11,
        13,
        17
      ],
      "default": 13
    }
  }
}
Let's edit the preferences code that's just been added. We need to change the material under the properties line:
- sampleDrumroll : Please change the name here. The revised name will be referenced from the ProxyCore file. We'll use "diceShape" for our example.
- x-title、x-description : Please title and explain to the user the preferences that you want them to set in your Piece.
- enum : Change the elements here to reflect the options we're giving to the users (which in our example are 6, 8, and 12)
- default : Set a default value from among the choices you included in the enum. We'll choose 6 as our default to represent your standard 6-sided dice.
"preferences": {
  "type": "object",
  "properties": {
    "diceShape": {
      "x-input-type": "drumroll",
      "type": "number",
      "x-title": {
        "ja": "サイコロの面数",
        "en": "Dice Shape"
      },
      "x-description": {
        "ja": "サイコロの面数を設定してください。",
        "en": "How many sides do your dice have?"
      },
      "enum": [
        6,
        8,
        12
      ],
      "default": 6
    }
  }
}
Add an Output
You can select your output type by going to Insert > Output. Our sample Piece is outputting a number value (the result of rolling a single die with up to 12 sides), so we want a number output that will send our result (1-12) to the next Piece. Please navigate to Insert > Output > Number.
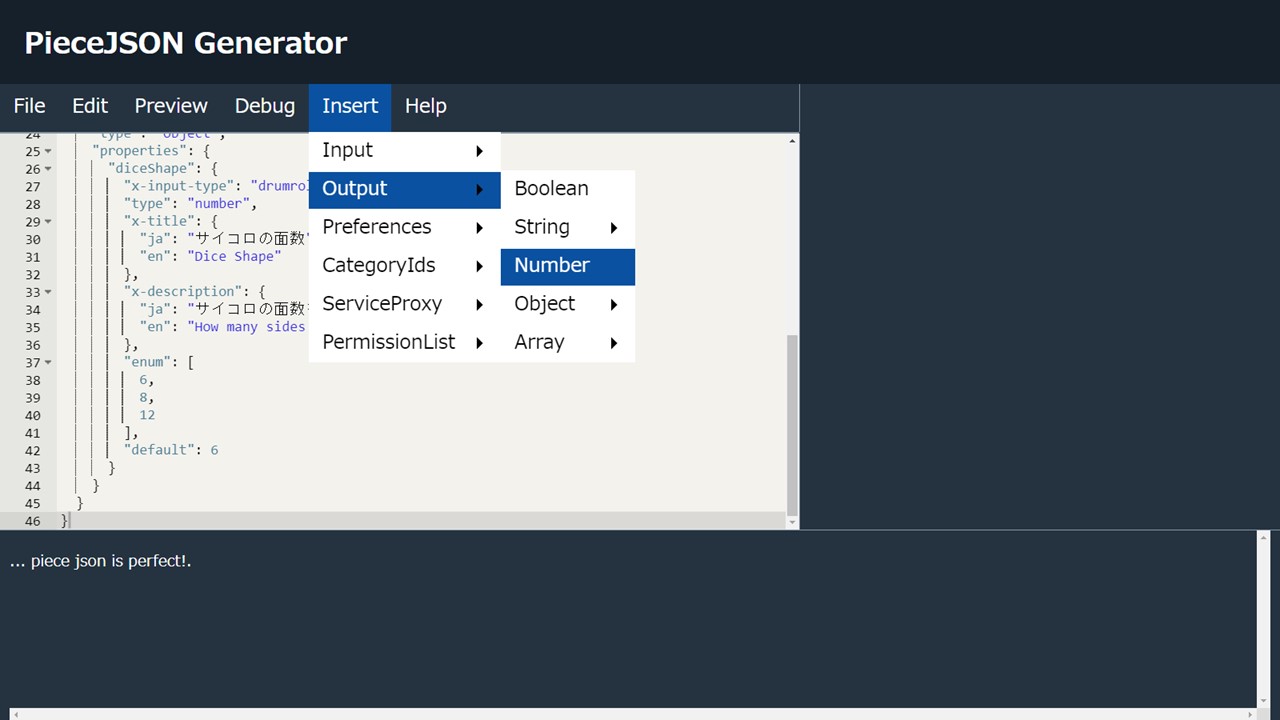
Clicking on Number there will add the following text to the PieceJSON file.
"output": {
  "type": "object",
  "properties": {
    "sampleProperty": {
      "type": "number",
      "minimum": 0,
      "maximum": 59
    }
  }
}
Now edit the added output code. We need to change the material under the properties line here as well.
- sampleProperty : Please change the name here. The revised name will be referenced from the ProxyCore file. We'll use "diceNumber" for our example.
- minimum、maximum : Change the range to accurately reflect the range of numbers your Piece outputs. We're setting the minimum to 1 and the maximum to 12 for our example.
"output": {
  "type": "object",
  "properties": {
    "diceNumber": {
      "type": "number",
      "minimum": 1,
      "maximum": 12
    }
  }
}
Debugging and Previewing
Format Confirmation
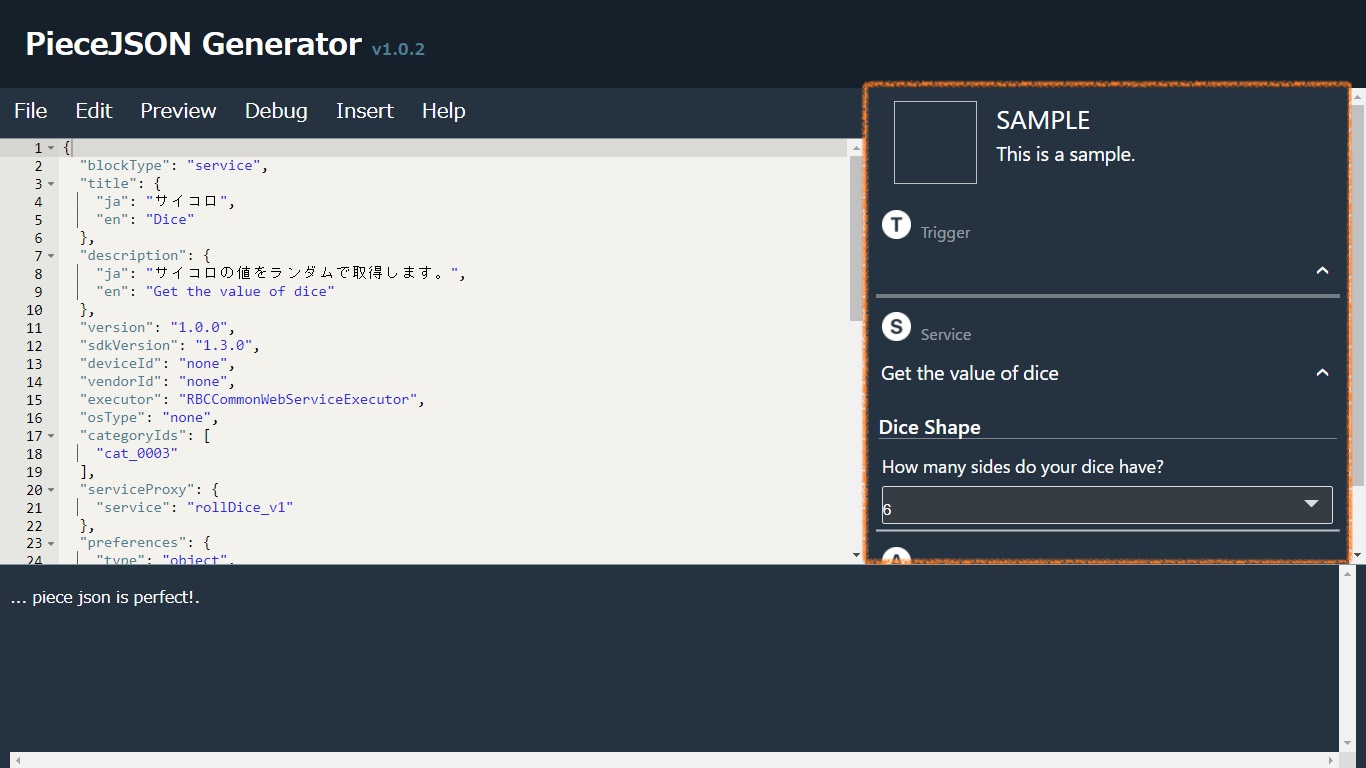
Let's check now whether our PieceJSON format is correct or not. Navigate to Debug > Check Piece Format to begin the check and, if everything is okay, you'll see the phrase ... PieceJSON is perfect! appear.
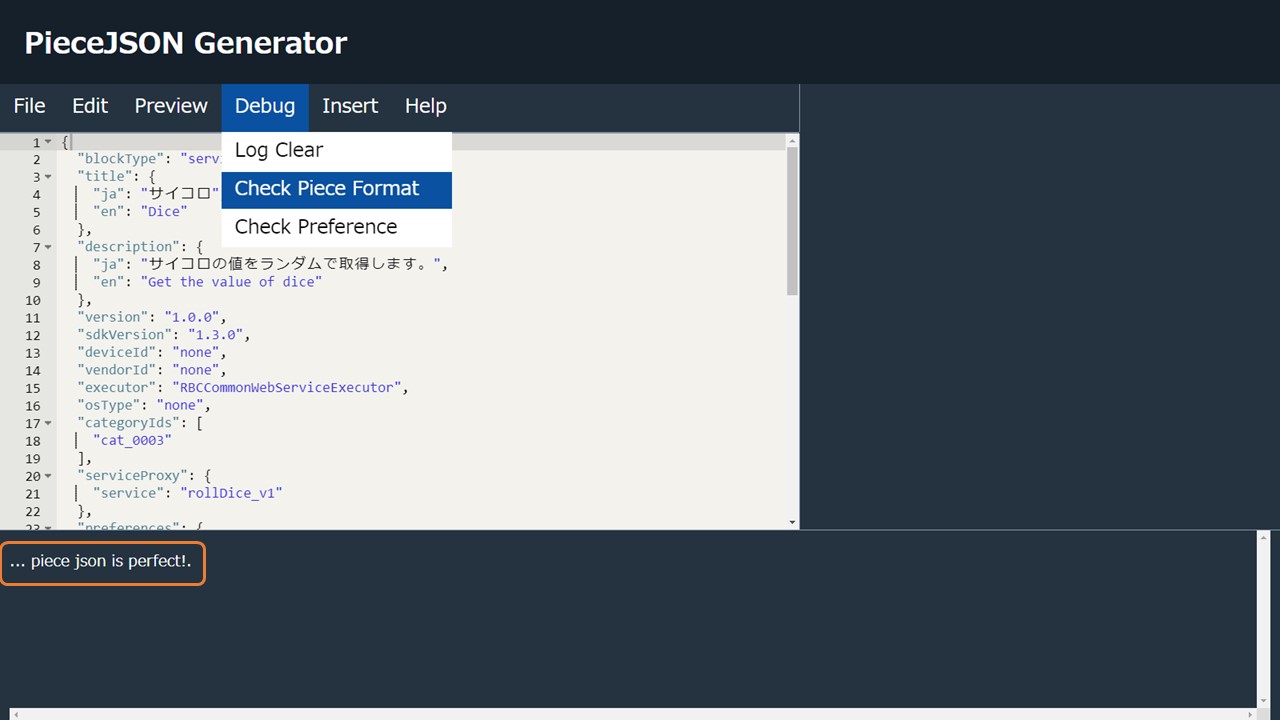
On the other hand, if the debugger spots any insufficiencies, you'll see an error message or messages specific to your Piece. Please be sure to correct these before continuing.
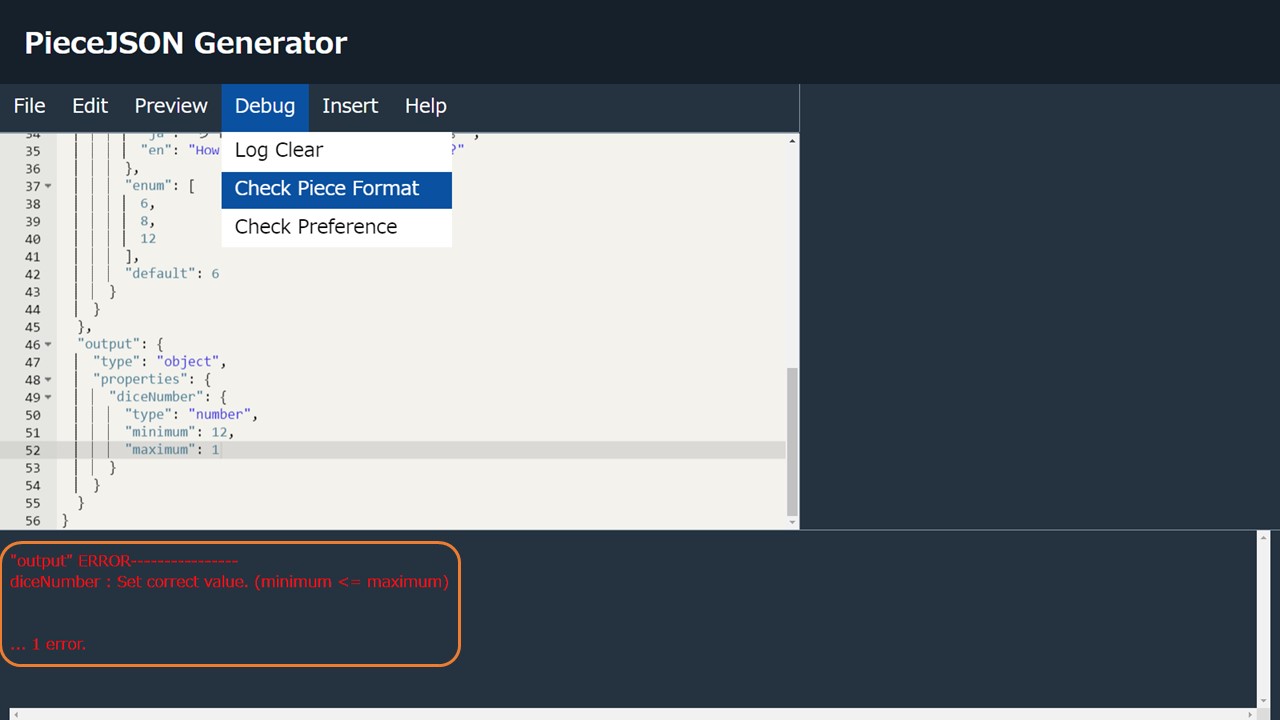
To clear all previous messages from the console, navigate to Debug > Log Clear.
Preview
You of course want to see how your Piece would appear to end users, so use the preview function to see how it will look when used in an iiidea within Citizen's Eco-Drive Riiiver app.
To see how English users will see your Piece, navigate to Preview > English. For the Japanese view, go to Preview > Japanese.
You will only be able to see the preview when there are no errors with your Piece, so please be sure to clean up any errors identified by the debugger first.
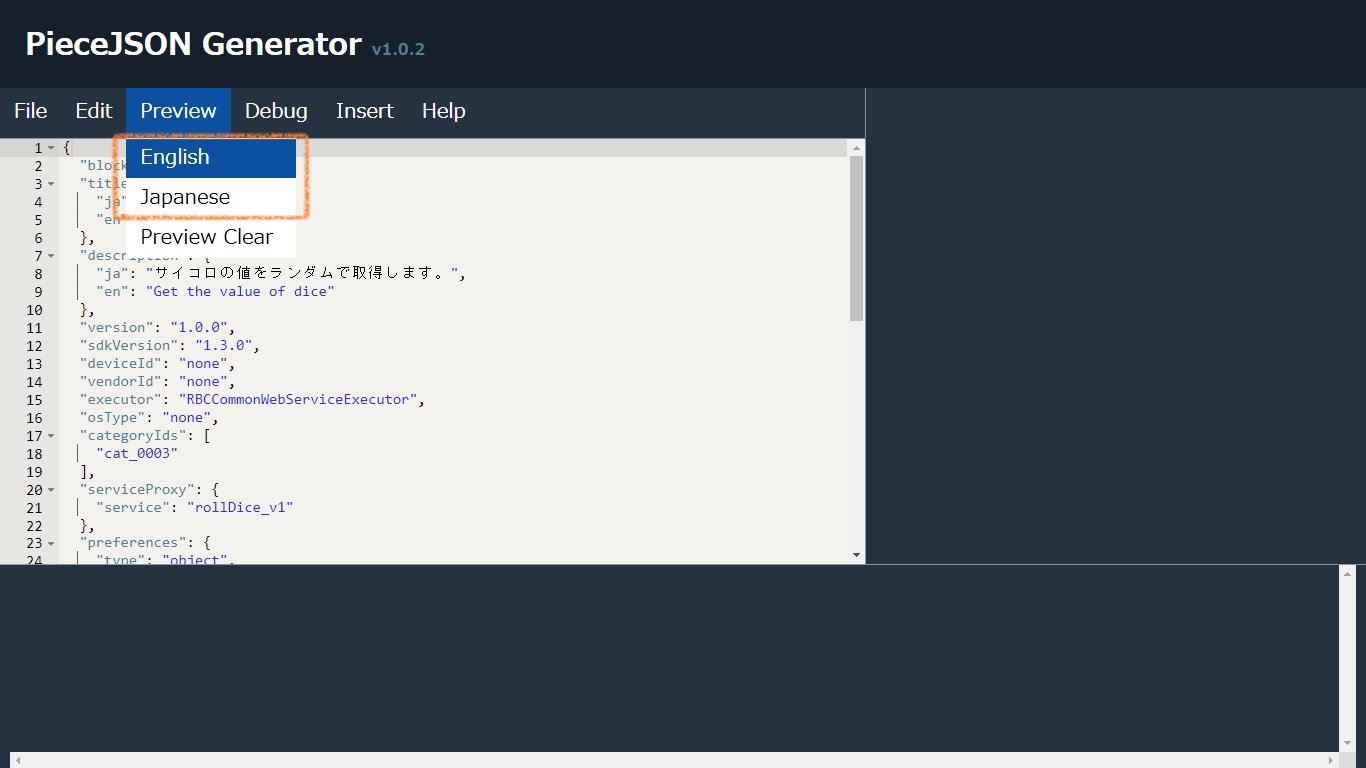
When you select the language, your preview will appear on the right side of the screen.
To clear the preview, simply navigate to Preview > Preview Clear.
Confirming Preferences
When your Piece includes preferences, you can actually confirm the function of the preferences by utilizing the Preview function. Navigate to Debug > Check Preference.
We're going to check here on whether the user selecting an 8-sided die actually results in the correct output...
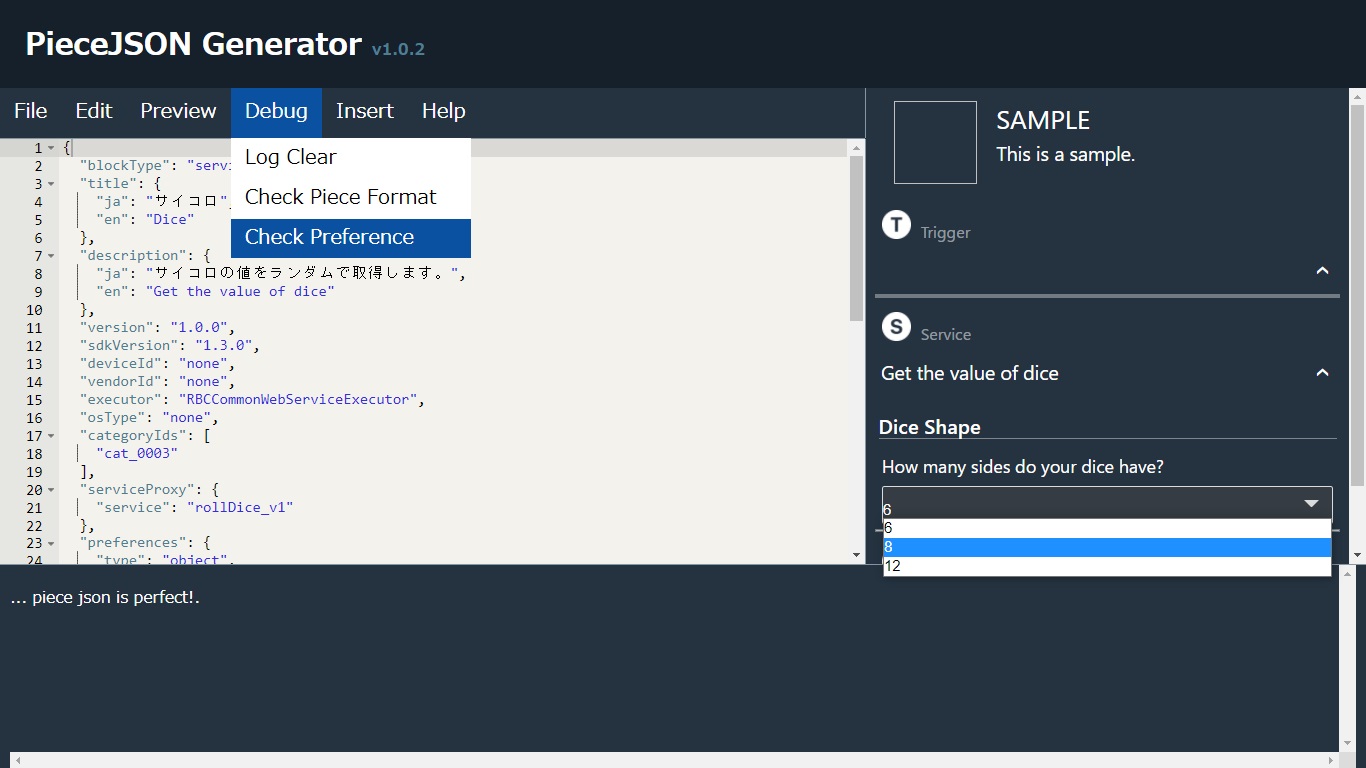
Use the preview image on the right side to click on the "dice shape" settings and choose the desired value.
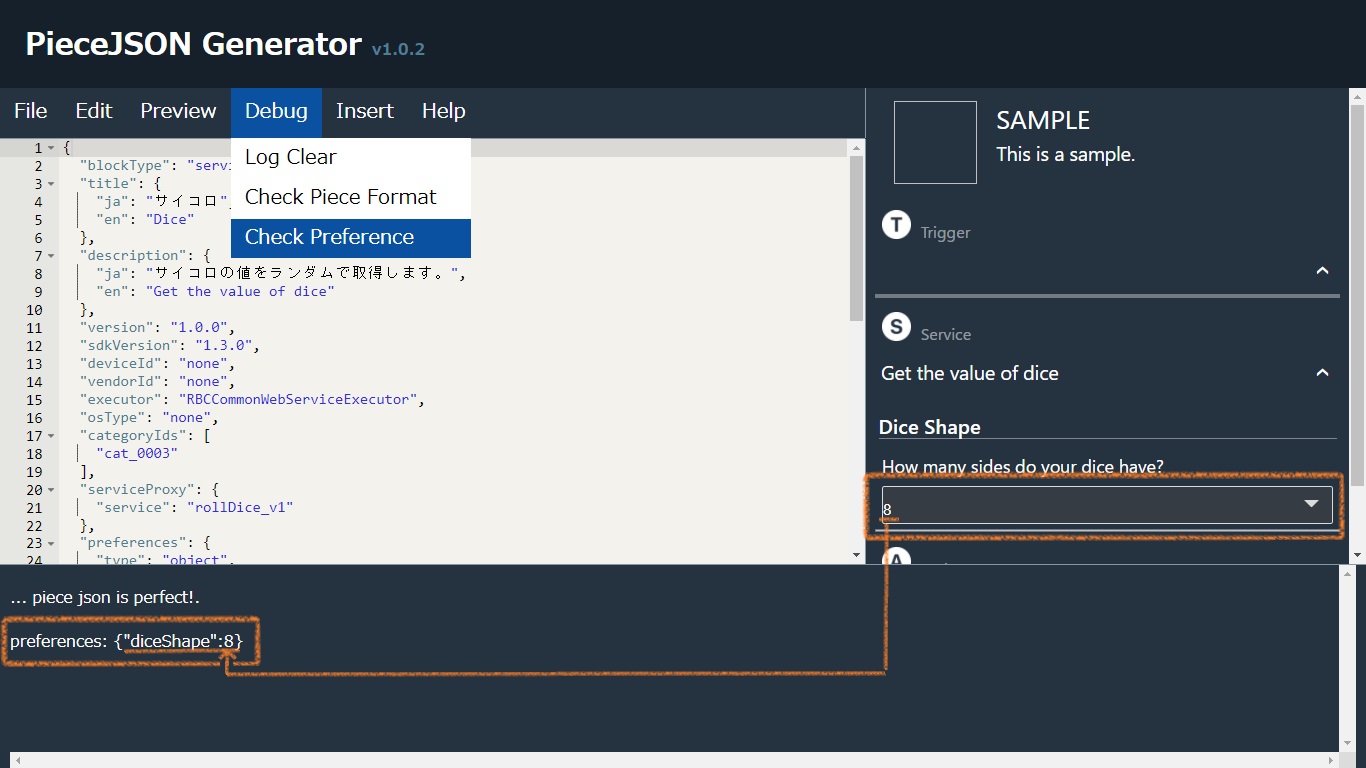
The bottom section of the console should display matching preferences text.
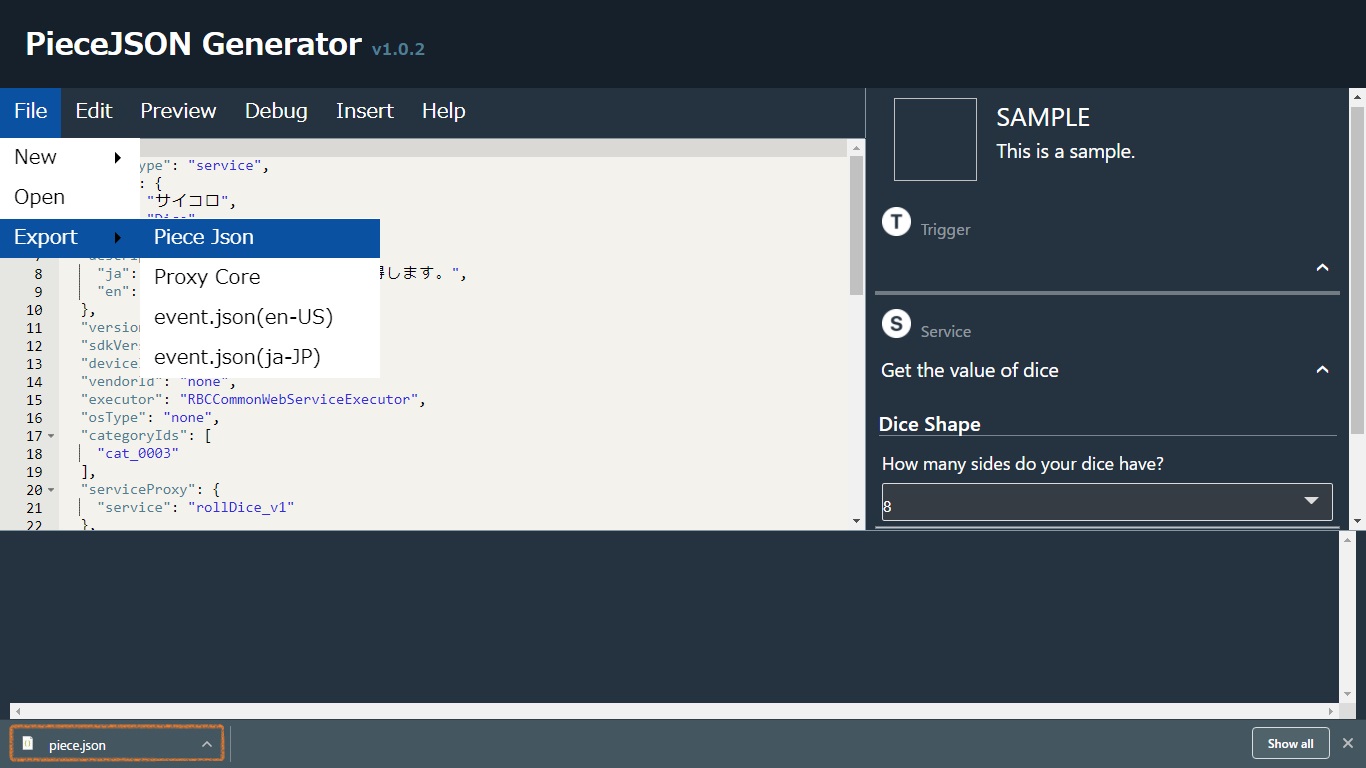
Save Your PieceJSON
Navigate to File > Export > Piece Json, click, and download your PieceJSON (piece.json) file.
Making ProxyCore
Using the SampleCode, let's now make a ProxyCore file.
Download the Sample
Navigate to Help > Download Sample and click to download SampleCode.zip.

Unzip SampleCode.zip to the folder of your choice.
SampleCode
├── .vscode
├── Readme.txt
├── kicker_on_lambda.js
└── YourCode
    ├── JSON
    │   └── pieceJson_Sample.json ✏️
    ├── ProxyCore
    │   └── pieceCore_Sample.js ✏️
    └── event.json ✏️
✏️ We're going to replace the files marked by this pencil with the PieceJSON files you created and downloaded using the PieceJSON Generator.
Go to (place you extract the sample folder)/SampleCode/YourCode/JSON in the Sample Code, delete pieceJSON_Sample.json, and replace it with the piece.json file that you just created.
Downloading and Editing the ProxyCore File
Downloading the ProxyCore File
Navigate to File > Export > ProxyCore within the PieceJSON Generator console and click to download your ProxyCore file. The name will be xxx.js, with xxx being the value entered for serviceCore in the code (in our example, rollDice_v1.js).
NOTE: Your computer may issue a warning message before allowing you to download this file, so please check for that message if the download doesn't seem to be working.

Go to (place you extract the sample folder)/SampleCode/YourCode/ProxyCore in the Sample Code and replace pieceCore_Sample.js with the new ProxyCore file you've just created and downloaded.
SampleCode
├── .vscode
├── Readme.txt
├── kicker_on_lambda.js
└── YourCode
    ├── JSON
    │   └── piece.json ✏️
    ├── ProxyCore
    │   └── rollDice_v1.js ✏️
    └── event.json ✏️
Editing the ProxyCore File
You'll find the following in the downloaded ProxyCore file:
(1) System necessary code
※ When using an external request module, please comment out line 4 (const request ...) and line 11 (if(request !== ...), and instead add in values specific to the module you are using.
※ Read more about this in the section on "Post-Lambda Operation" in our documentation on Using the Lambda environment to create Pieces.
(2) User-specific information variables(time of iiidea execution, device language/country settings)
※ When not using any of these variables, please comment out this information.
(3) PieceJSON input, output, and preferences variables
※ When these variables are not included in the PieceJSON, they are not described here in the ProxyCore.
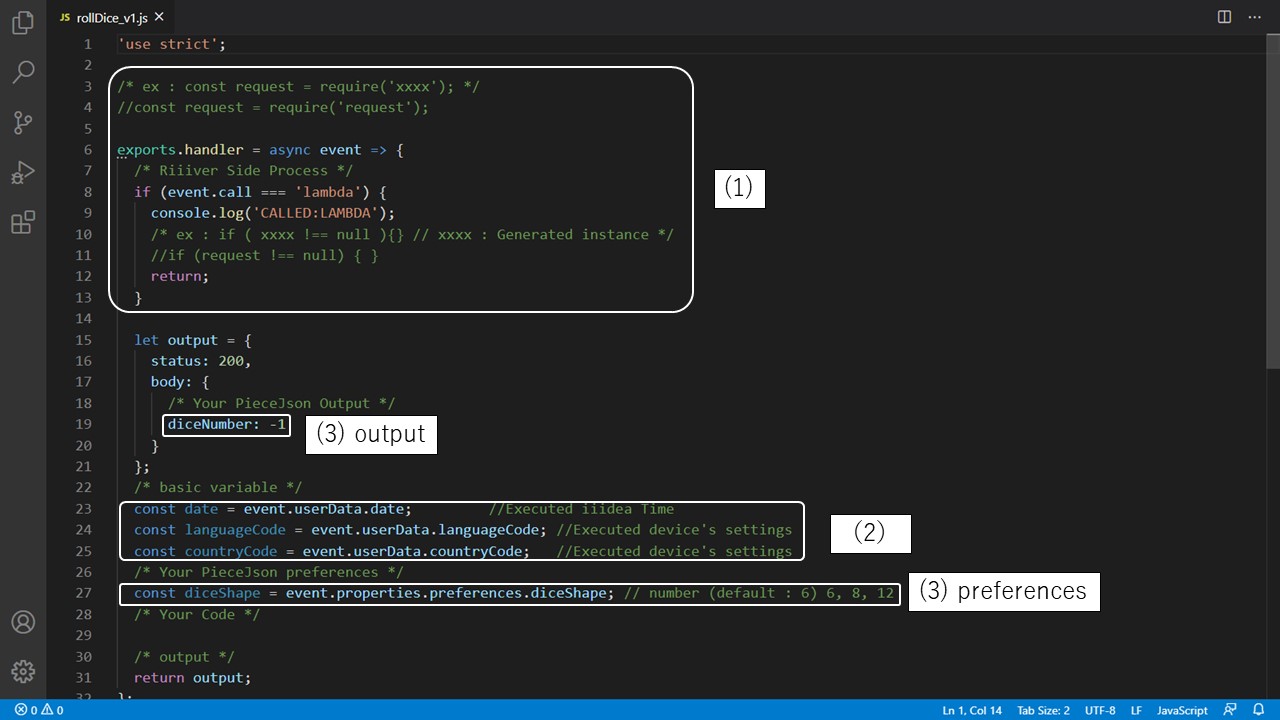
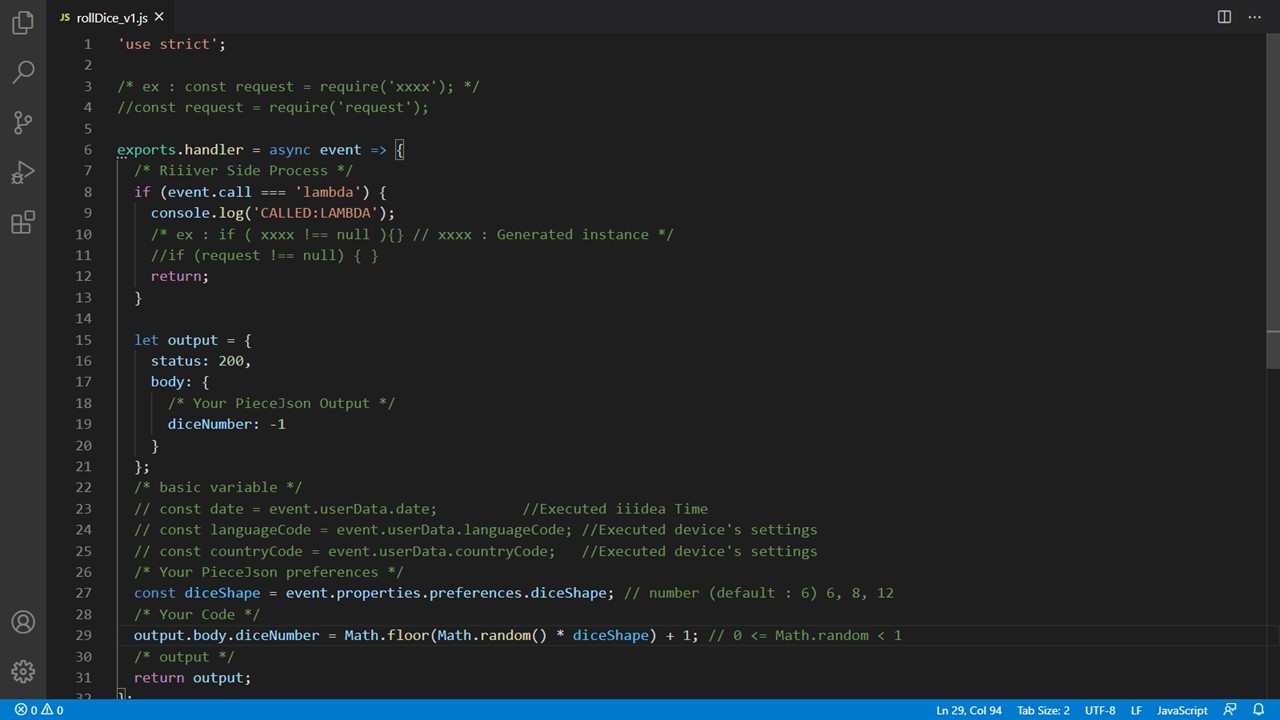
And finally, under the/* Your Code */ line, please enter the processing logic for your Piece.
Following these instructions, then, here's what we're going to do in the case of our (rollDice_v1.js) example:
(1) Comment out the external module text, since we are not using an external module.
(2) Comment out lines regarding user information, since we are not using that either.
(3) Use as is. The output (diceNumber) and preferences (diceShape) are described, and, since we are not requiring any specific input, this is not described.
Under /* Your Code */, we write the code that we are using to create our random dice roll. Using the diceShape preferences value selected by the user, we are outputting a random number, which then becomes the output diceNumber value.
output.body.diceNumber = Math.floor(Math.random() * diceShape) + 1;
Debug
Download event.json
Navigate to File > Export > event.json(en-US) to download the English event.json file, or event.json(ja-JP) for the Japanese version.
en-US and ja-JP represent the device language (en/ja) and country (US/JP) settings.
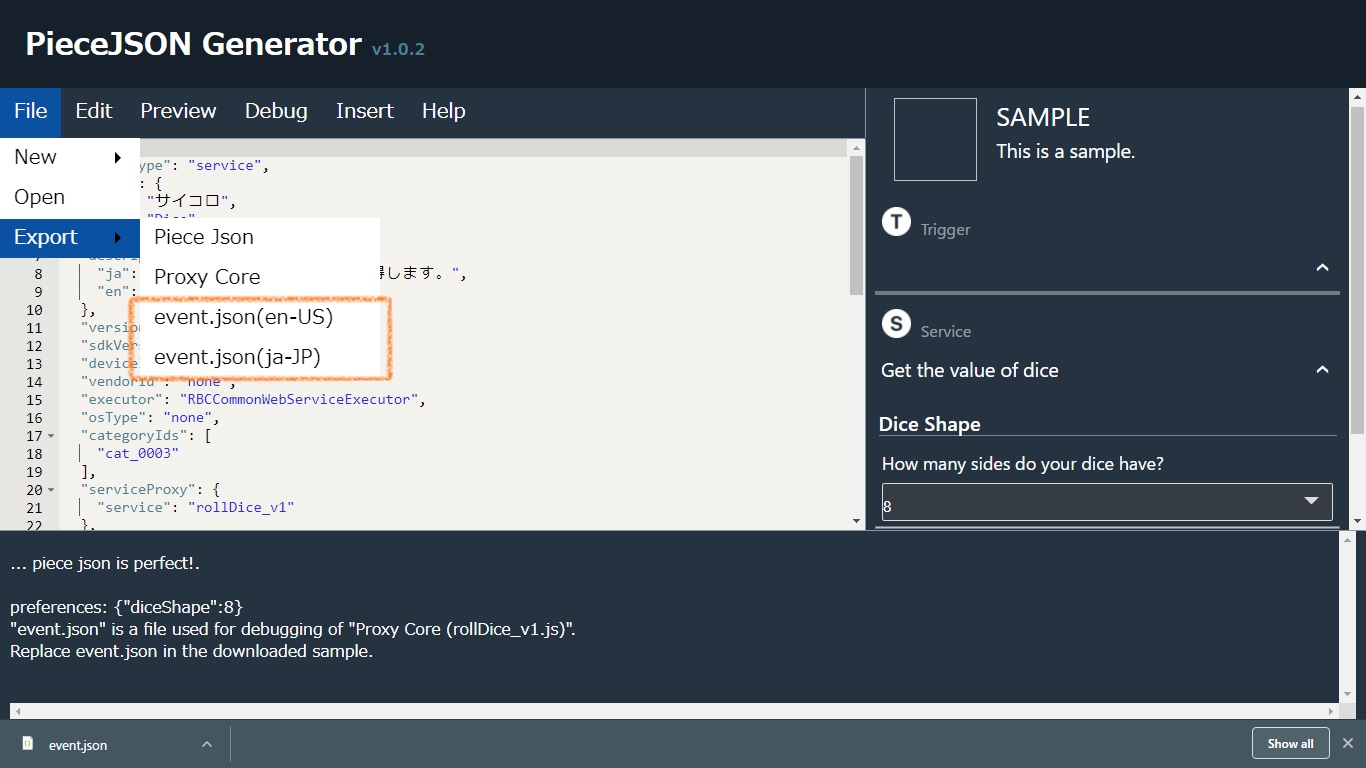
Replace the event.json file in the SampleCode located at (place you extract the sample folder)/SampleCode/YourCode/event.json with the event.json file you downloaded for your Piece.
Editing and Debugging the event.json
After downloading and opening the file, your editor may show you the entire contents in a single line({"serviceProxy":"rollDice_v1","properties":{"preferences":{"diceShape":6},... ).
When formatted correctly, however, the code should appear like this:
{
  "serviceProxy": "rollDice_v1",
  "properties": {
    "preferences": {
      "diceShape": 6
    },
    "parameters": {},
    "input": {}
  },
  "userData": {
    "date": "2020-08-11T09:04:27+0900",
    "languageCode": "ja",
    "countryCode": "JP"
  }
}
User-specific information from the PieceJSON (time of iiidea execution, device language/country settings, etc.), preferences, input, and parameters are all included in the event.json file.
Using your computer terminal or terminal app, go to (place you extract the sample folder)/SampleCode and execute kicker_on_lambda.js. The result of your ProxyCore file(rollDice_v1.js) will be output.
# For Windows
C:\SampleCode> node .\kicker_on_lambda.js
# For Linux / Mac
~$ node kicker_on_lambda.js

Your Function Output :: { status: 200, body: { diceNumber: 6 } }
To test and debug instances with different preferences or other information, please edit the event.json. For instance, to confirm the Piece works when changing the number of sides on the die, change the value of "diceShape" in the event.json. If you change "diceShape" to 12, the output will reflect the result of rolling a virtual 12-sided die.
# For Windows
C:\SampleCode> node .\kicker_on_lambda.js
# For Linux / Mac
~$ node kicker_on_lambda.js

Your Function Output :: { status: 200, body: { diceNumber: 11 } }- If you want the example of "Dice Roll"
- Click and download Dice_SampleCode.zip